 GAOERJI STEEL
Search
How To Erect A Steel Building
The entire process of building a steel structure, from the initial drawing planning and fixing the “admission ticket” (permit), to pouring a solid concrete foundation, to using a crane to assemble the pillars, purlins and rafters like building blocks, is linked together. Follow-up also have to install wall panels, roofs, doors and windows, but also to do a good job of insulation.
Any link in the middle, especially the neglect of the manufacturer’s installation instructions, may lead to rework. To successfully build a steel structure, one must have patience in addition to the brain to understand the drawings.
Let me take this standard process apart and talk about how to do it.
This video provides a complete walkthrough of the steel building construction process:
Step1: Planning And Site Preparation
Before the first steel column is erected, the underground effort often determines the success or failure of the project. This stage is not only to go through the process, but also to clear the subsequent obstacles.
Design & Permits
It all starts with engineering drawings. These drawings are not simple references, they are maps for your construction. In the meantime, you have to get the legal stuff done:
- Survey and testing: find professional people to do land survey, determine the red line. What’s more important is soil testing. It must be ensured that the ground can withstand the weight of the steel structure.
- Permit: Submit the drawings to the local department and get the building permit. My advice to novices is: don’t move the ground until you get that piece of paper. This is not only a matter of compliance, but also to ensure that you comply with local safety regulations.
Site Work
After the document is completed, you can move the real thing:
- Clean up: clean up all the vegetation, stones and garbage on the site.
- Land leveling: to level the ground. This is not only for good construction, but also for drainage. You certainly don’t want the water to run down the building when it rains heavily in the future.
This video demonstrates the importance of proper site preparation and foundation:
Step2: Foundation And Anchorage
How long a steel structure building can last depends entirely on how the foundation is played. This is the only interface between your building and the earth.
Pouring Concrete Slab
Pouring concrete is a step with extremely low fault tolerance. This board must be engineered to withstand the specific loads of your building. The point is, the surface must be absolutely level. If the concrete surface is uneven, when you put up the steel frame, the error will be magnified indefinitely, and it will be difficult to remedy it.
Anchor The Frame
The connection point between the foundation and the steel column is the anchor bolt.
- Embedded bolts: bolts must be embedded in wet concrete in strict accordance with the coordinates of the drawings.
- Connection: When the concrete is dry, the main steel members are directly locked on these bolts. There is no room for negotiation here-accuracy is everything. Even if the bolt position is a little bit (a fraction of an inch) off, the entire steel frame is not aligned.
Step3: Frame Erection
Watch this video for a detailed demonstration of how to erect the steel frame:
This is the most fulfilling stage, the house finally has a look. But in this step, must die knock manufacturer’s installation guide.
Column
Usually we start with the main rigid frame:
- First, get the “support span” : that is, the span with diagonal supports. Put this part of the side wall column up first. When this step is done, you have a solid core, and other structures can be attached to it.
- End wall: After the main structure is stable, the columns of the end wall are made.
Wall Beams And Rafters
Once the columns are in place, it is time to go up the horizontal and roof support structures:
- Rafters: Use a crane or elevator to lift the rafters up, lock them with the pillars, and the slope of the roof comes out.
- Wall beam: the wall beam is installed horizontally on the side wall column. This is the skeleton of the wall panel after hanging.
Purlin
The purlins are mounted on the rafters to support the roof panels. They connect the rafters into one body and increase the rigidity of the roof.
Temporary Support
I’m going to add a security alert here: don’t be lazy and save the temporary support. Before all the bolts are completely locked, the whole shelf is very fragile in front of the wind. I ‘ve seen the tragedy of half-built shelves being blown down by the wind. Cables or temporary steel bracing must be used to ensure that all columns and rafters remain vertical and stable until the entire frame is completely completed.
Step4: Plank, Thermal Insulation And Edge Closing (Sheeting, Insulation & Trim)
The skeleton is set up, now it is necessary to dress it-to make rain and insulation.
Base Angles
First, fix the bottom angle steel on the periphery of the foundation. This provides a base for the wall panels and also seals the gap between the concrete and the steel wall.
Wall Panels & Insulation
- Installation sequence: usually start from a corner and load it inside. Be sure to look at the direction of overlap in the instructions to ensure that the water can flow along the joint instead of seeping in.
- Insulation: If you are using coil insulation, you should put the insulation cotton in the wall board at the same time, sandwiched between the panel and the wall beam.
Roof Panels
Laying the roof is a meticulous job, and you must wear safety equipment when working at high altitude. Usually, the installation union first spreads a roll of “start-up roll” insulation cotton, and then covers the roof panel on the purlin. Alignment is the key. This step is not right. The roof will definitely leak in the future.
Trims
The edge pieces are not only for good looks, but also for weatherproof. In the corner, the eaves, the gable edge and the ridge cover to install the edge of the piece. After this step is completed, your building will be truly “dried in.
Step5: Doors, Windows And Finishing
The last step is to turn a steel shell into a usable workshop or facility.
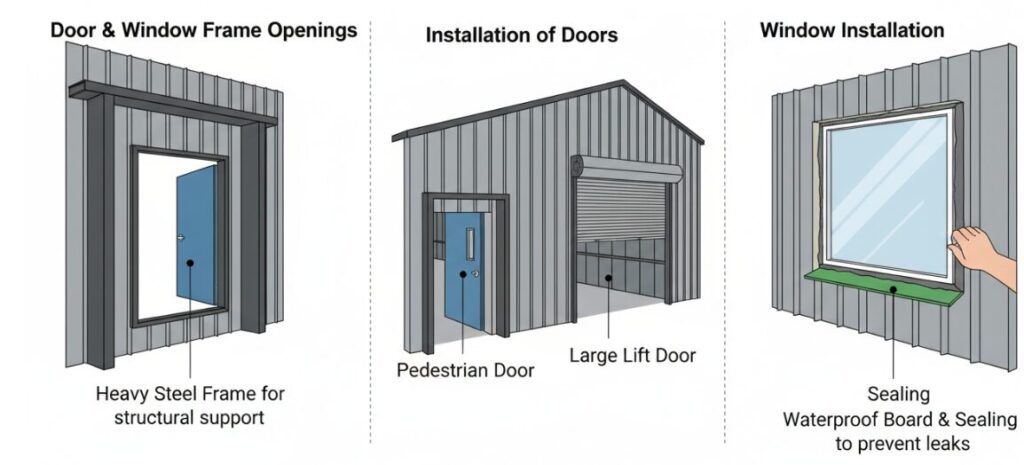
Door And Window Frame Openings
A heavy steel frame must be installed before fitting. This ensures that the opening is square and strong, whether you are installing a door or a window, you need this structural support.
Installation Of Doors And Windows
- Hanging the door: put the pedestrian door and the large lift door into the box just made.
- Windows: When installing windows, be sure to do a good job of waterproof board and sealing to prevent rainwater from pouring back.
Final Acceptance And Internal Work
- Acceptance: About the local building officials to do the final inspection. This level must be passed before you can get the occupation certificate (Certificate of Occupancy).
- Interior decoration: After the shell passes the acceptance, you can enter the site to do water and electricity heating, pull wires, lay water pipes, or install partition walls according to the purpose.
In this line of work, every step has to be steady. In this order, your steel structure can stand and last for a long time.
Author: Robert Cole
“With over 15 years in industrial construction, I specialize in steel structure erection. From pouring the complex concrete foundation to bolting the final purlins, I share practical guides to help you manage your building project safely and precisely.”