 GAOERJI STEEL
Search
How To Install A Window In A Steel Building
To install a window in a steel building, you must first construct a structural sub-frame (using C-channel or tube steel) between wall girts to support the window’s weight. Once framed, trace the dimensions onto the metal siding, cut the opening, and install J-trim (J-channel) to act as a water diverter. Apply high-quality butyl tape to the window flanges, set the unit ensuring the fins align with the panel ribs, and secure it with self-tapping screws. Finally, seal the top and sides with polyurethane sealant, leaving the bottom unsealed to allow for proper drainage.
STEP1: Constructing The Structural Sub-Frame
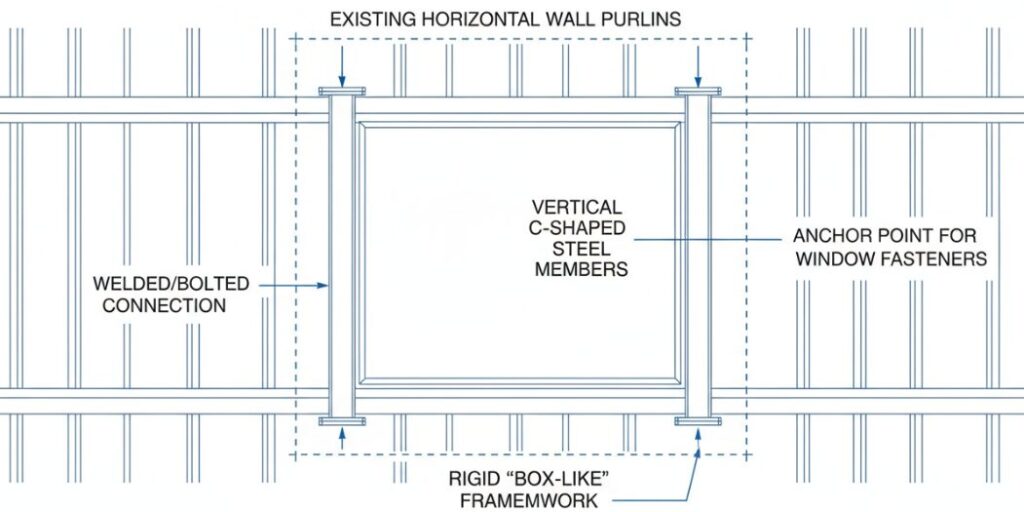
The most critical first step is to create a rigid framework. You need to span the existing horizontal wall purlins.
The specific approach is to install C- shaped steel or square pipes vertically between the upper and lower purlins according to the height of the window. These members are to be firmly welded or fixed to the purlin to form a “box-like” opening. This sub-frame not only ensures the structural integrity of the steel structure, but also provides a really difficult anchor point for the window fasteners.
STEP2: Cutting Metal Wall Panels
After the internal skeleton is fixed, the size of the coarse hole must be transferred to the metal wall panel. It is easy to deviate directly from the outside. The safest way is to drill several positioning holes in the four corners of the sub-frame from the inside to the outside.
A cutting line is drawn on the surface of the metal panel based on the outer positioning hole. At this time, nibbler (punching and shearing machine), metalworking shears or angle grinder can be used to cut off the opening. As a reminder, cutting metal plates will produce very sharp edges and splashing debris, so safety equipment must be fully worn.
STEP3: Installation Of J-strip For Diversion
Before putting the window up, you must first deal with the waterway management, which requires the use of J-type edge strips . This trimming strip has two functions: 1, it covers the ugly and covers the rough and sharp metal burrs just cut out; 2, it is used as the main water guiding device.
Measure and cut the J-trim to fit the perimeter of the opening. When installing, let it wrap the cut edge of the wall panel to form a groove for the window. If this step of installation is not standardized, water will easily seep into the back of the wallboard, which will be very troublesome.
Steel Structure Workshop
Steel Structure Workshops offer versatile designs. Clear Span ensures unobstructed space, while Centre and Intermediate Columns provide economical solutions for wide spans.
Bridge/Steel Structure Bridgeipsum
Steel Structure Bridges utilize high strength-to-weight ratios to achieve long spans where intermediate supports are difficult.Their versatility makes them essential for critical infrastructure connectivity.
Steel Structure Buildings
Steel Structure Buildings feature versatile designs to meet diverse needs. Clear Span offers open space, while Centre and Intermediate Columns increase economy for large spans. Multi Gable accommodates complex widths.
STEP4: Butyl Tape And Setting The Window (Applying)
The waterproofing between the windows and the steel walls relies on high-quality butyl tape. Apply a continuous strip of tape to the back of the window flange (fins). Do not use ordinary sealant (caulk) to make do with this step, because the thermal expansion and contraction of the steel structure are large, only butyl tape can provide the superior flexible seal, and will not crack due to temperature difference changes.
Lift the window carefully into the hole. Note that the metal wall panels have peaks and valleys, you must ensure that the flange edge of the window is correctly aligned with the crest of the panel, so as to form a flat installation surface. Press the window firmly against the wall, allowing the butyl tape to deform under pressure so that it adheres tightly to the wall panel or J-trim.

STEP5: Securing And Sealing The Unit
After the window is pressed in place, it is time to apply the self-tapping screws. The screws go through the window flange, through the metal wall panel, and finally directly into the C- shaped steel or square tube sub-frame you started to make. The tightening force should be just enough to compact the butyl tape, but also be careful not to deform the window frame.
The last step is to apply the external sealant. It is recommended to use high-grade polyurethane sealant for this job, which has the best adhesion to metal surfaces. Apply glue along the top header and both sides of the window flange. Here is a detail that is well known in the industry but often overlooked: the bottom flange should not be sealed. The bottom is left empty in order to allow the water vapor seeping into it to be discharged in case of carelessness, so as to prevent rust and damage to the structure over time.
Author:Jackson
“I am a metal building construction specialist with over 15 years of field experience. My expertise focuses on structural steel framing and exterior finishing. I specialize in helping building owners execute precise modifications—from welding C-channel sub-frames to ensuring watertight J-trim installations—guaranteeing that every project withstands the elements.”