 GAOERJI STEEL
Search
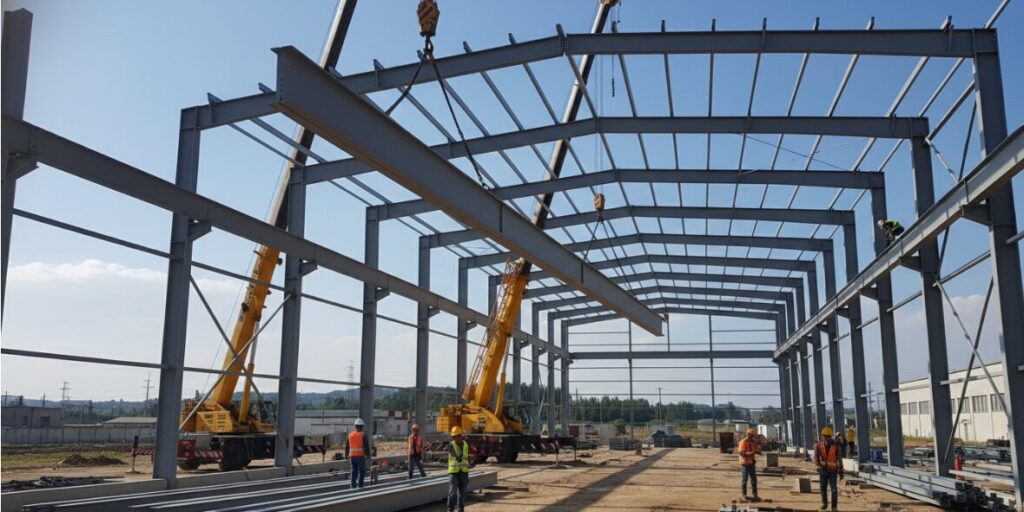
How To Assemble A Steel Building
To assemble a steel building correctly and safely, you must follow a strict structural sequence: First, check your concrete foundation and anchor bolt layout, which must be exactly the same as the technical drawings. Then, unload and arrange the material stacking reasonably (called Staging on site), which directly affects the efficiency. The assembly process usually starts with the erection of the column of the main steel structure (that is, the saying “red iron”), then the roof girder is pre-assembled on the ground, and then the whole is hoisted in place. After the main frame is set up, the secondary structure is installed immediately, and the cable support force is used to “plumb and square”. Finally, it is to install thermal insulation cotton, roof/wall panels and edge pieces, and at the same time ensure that all water stop tapes are in place, otherwise there will definitely be water leakage.
The following is the detailed dismantling:
Step 1: Foundation Calibration And Foundation Bolt Inspection
Before even steel members are lifted, the success or failure of the project depends entirely on how well the concrete is done. You must verify that the layout of the foundation and anchor bolts perfectly matches the drawings. This is definitely not a link that can be rushed through.
Pick up the tape measure and check the center distance of the anchor bolts. More importantly, be sure to check the diagonal measurement of the foundation. If the two diagonal lengths are not equal, then your floor is crooked (not square). If you insist on erecting a set of square steel components on a foundation that is not square in itself, there will definitely be serious dislocation problems behind it. In addition, it is also necessary to confirm that the height of the anchor bolt exposed to the concrete is correct, and to ensure that the lower column bottom plate and nut can be installed.
Step 2: Material Stacking: Unloading And Site Organization
In fact, in the final analysis, it is the on-site organization, which is what we often call “Staging”. When the delivery truck arrives at the scene, don’t unload the materials directly into a pile to save trouble. You need to organize the material methodically and make sure it’s readily available while you’re working.
This process, usually called “Shake out”, includes:
- Unload the column directly near the corresponding anchor bolt.
- The roof beam is classified and placed in an open area to facilitate pre-assembly on the ground.
- Stack the enclosure board and insulation cotton on the cushion wood, cover it, and keep it dry until the last step.
With this step done, you can avoid digging through a lot of heavy steel for hours just to find the part number needed for the next step.
Step 3: Erection Of Main Frame: Column And Girder
The assembly process officially began with the erection of the main structural components, which is commonly known in our industry as “Red Iron”.
- Vertical Column: first hang the main column to the anchor bolt. Screw on the anchor nut to fix it, but here is a skill: don’t screw it to death first, leave a little looseness for subsequent fine adjustment.
- Pre-Assembly Girder: for safety and convenience, try to put the roof girder on the ground, not in mid-air. Connect the beam sections according to the bolt map in the manual.
- Lifting Girder: lift the assembled girder with forklift or crane and connect it to the bracket at the top of the column.
Safety tip: Never loosen the hook of the lifting equipment until the girder is firmly bolted to the column and stabilized.
Step 4: Install The Secondary Structure
Once the main frame (columns and beams) stands up, the whole structure is actually still wobbly. You must immediately install the secondary structure to connect the frame into a whole. This includes the installation of roof purlins and wall girders.
These components provide the necessary structural rigidity to lock the main frame, while also providing attachment points for subsequent installation of wall and roof panels. It is important to make sure that these bolts are tightened, because they form the bones that support the building shell.
Step 5: Plumb And Square
The use of cable support strength for “sagging and leveling” is the most critical step before the planking. Even if the steel structure has been erected, the building will often be slightly tilted or twisted.
You cannot install wall or roof panels on a skewed building. If you force it, the screw holes will not match and the edge parts will not fit in.
- Cable Support: X-shaped support (cable or tie rod) provided in the installation kit.
- Tensioning And Adjustment: Tighten the flower basket bolt on the steel cable and pull the building back to the normal position. In this process, we should constantly measure with a level on the column and check the diagonal repeatedly.
- Final Torque: Only when the building is completely vertical and square can you turn back and put all the structural bolts on the columns and girders for final torque.
Steel Structure Workshop
Steel Structure Workshops offer versatile designs. Clear Span ensures unobstructed space, while Centre and Intermediate Columns provide economical solutions for wide spans.
Bridge/Steel Structure Bridgeipsum
Steel Structure Bridges utilize high strength-to-weight ratios to achieve long spans where intermediate supports are difficult.Their versatility makes them essential for critical infrastructure connectivity.
Steel Structure Buildings
Steel Structure Buildings feature versatile designs to meet diverse needs. Clear Span offers open space, while Centre and Intermediate Columns increase economy for large spans. Multi Gable accommodates complex widths.
Step 6: Slab, Thermal Insulation And Edge Closing
The final stage of steel structure assembly involves the building envelope. This step is very detailed, especially waterproof.
- Insulation Cotton: before laying the metal plate, first spread the insulation cotton on the roof purlin and wall beam.
- Roofing And Wall Panels: Screw the plates to the secondary structure. Keep the plate ribs straight and strictly follow the screw arrangement pattern, which is related to the wind load resistance level.
- Water Stop Tape: This is the life door to prevent water leakage. Mastic tape must be applied to the overlap of the sheets and under the trim piece. To be honest, if you save this step, your house will leak 100%.
- Edge Closing: finally install corner edge closing, sealing eaves board and gutter to seal the edges and make the building look professional and tidy.
Frequently Asked Questions (FAQ)
A: In most cases, yes. Because you have to deal with heavy “red iron” columns and pre-assembled girders, it is neither safe nor realistic to lift them manually. For that kind of small workshop, a telescopic forklift (telehandler) or a heavy forklift may be enough, but for large-span buildings, a crane must be used to lift the main frame and keep it stable when workers hit bolts.
A: Generally speaking, you need at least a team of 3 to 5 people. You need one person to operate the lifting equipment (forklift or crane), while others are responsible for guiding the steel structure, inserting bolts and handling the secondary structure on the ground or on the lift. It is extremely dangerous to want to do this job alone, and at the stage of “vertical adjustment”, one person simply cannot do it.
A: Skipping this step is the most common cause of assembly failure. If you force the structure straight without cable support, your building will be crooked. As a result, the pre-cut roof and wall panels do not match the screw wires at all, the edge parts cannot be installed, and the building is likely to have structural defects and water leakage problems.
A: It’s much more difficult to do that. As I mentioned in the assembly process, the insulation cotton should be placed on the secondary structure (purlins and wall beams) before the external panels are nailed. This ensures the formation of a tight broken bridge insulation and the insulation cotton is firmly clamped between the steel frame and the plate.
Author: Jason Miller
I am a Senior Steel Erector with over 18 years of field experience in pre-engineered metal buildings. Having managed the assembly of millions of square feet of ‘red iron’ across the country, I specialize in structural integrity and precise weatherproofing.