 GAOERJI STEEL
Search
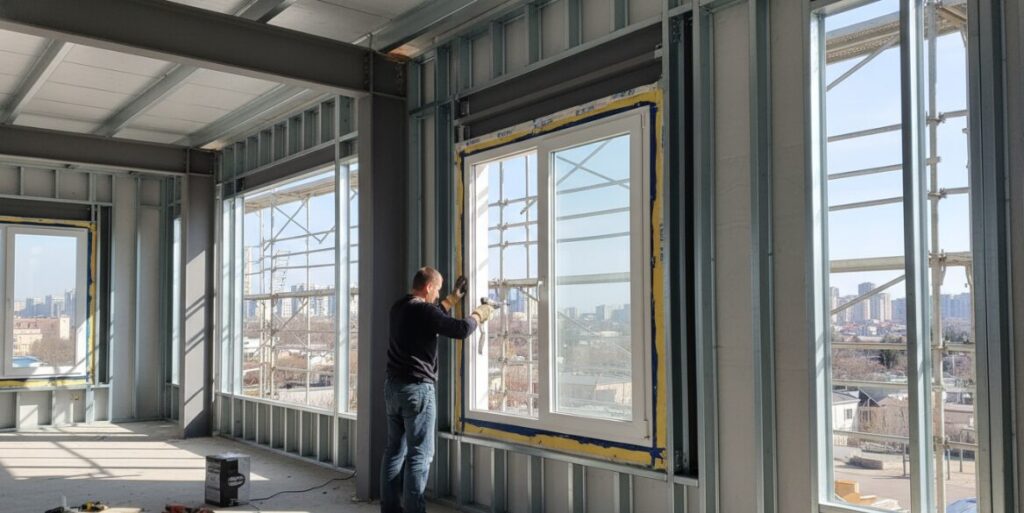
How To Install A Vinyl Window In A Steel Building
To properly install plastic steel windows in steel buildings or Barndominium, you need to use the “wood frame system” to build a bridge between the fixed nail of the window and the steel wall purlin.
The whole process can be roughly broken down into six key steps:
- Construct wood base: Construct a strong wood sub-frame (I. e. buck) between vertical steel columns or horizontal purlins using a 2x 4 or 2x 6 wood square that has been treated with corrosion protection.
- Cutting metal plates: Use a step punching machine or electric shears to accurately cut wavy metal wall panels according to the size of the wooden frame (remember: don’t use an angle grinder, this is to prevent rust).
- Class I waterproof seal: stick a circle of heavy butyl tape on the outer edge of the wooden frame to establish the most basic waterproof barrier.
- Installation and fixing: put the plastic steel window into the hole, make sure it is vertical, horizontal and square diagonally, and then fix the nail edge directly on the wooden frame.
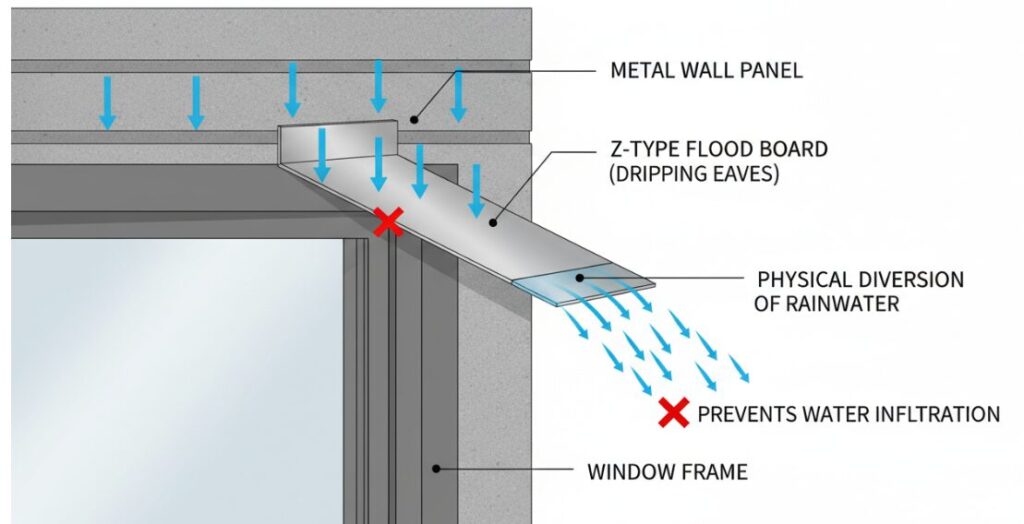
- Install the water stop folding piece: install a custom Z-shaped flood board on the top of the window to guide the water to the outside of the window.
- Edging and Sealing: Externally, use J-shaped strips to close out metal burrs, and use high-grade polyurethane sealant to close all gaps.
This “wooden frame method” not only provides the necessary installation depth for the window, but also effectively solves the sealing problem caused by the unevenness of the metal wall panel.
Why The Wood Buck Method?
When studying how to install plastic steel windows on steel structure buildings, many installers will be stuck on a practical problem: plastic steel windows are designed for flat surfaces, while our steel structure buildings are all wavy profiled steel plates. These two things don’t naturally match.
The “wood frame system” mentioned above is to solve this contradiction. It acts as a perfect interface-both to provide a flat, nail-eating surface for the nail edges of the plastic steel window, and to create enough depth to digest the peaks and troughs of the metal plate. Below, we’ll detail those six key steps to ensure your installation is both professional and weather resistant.
Step 1: Build A Wooden Frame
The success or failure of the installation is based on the framework. You must not simply and roughly screw the plastic steel window on the thin iron wall panel.
- Material selection: must use anti-corrosion treatment of 2x 4 or 2x 6 wood square. This can not be saved, because the wood will be in direct contact with the metal, and the metal with the temperature change easily produce condensation, ordinary wood in this condition will soon rot.
- Structural integration: The wooden frame should be firmly fixed between vertical steel columns or horizontal purlins. The role of this sub-frame is to transfer the wind pressure and the weight of the window back to the main steel structure of the building, rather than letting the window hang on the fragile wall panel.
Step 2: Cutting Wavy Metal Wall Panels
Once the wooden frame is in place, holes will have to be made in the outer metal plate. In this link, the choice of tools directly determines the life of the house.
- Precision tools: Please use a step punching machine or electric shears to cut the metal plate strictly according to the size of the wooden frame.
- Angle grinders are strictly prohibited: Never use an angle grinder. The high temperature generated by the angle grinder during cutting will burn the protective paint layer, and splashing sparks and hot iron filings will be embedded in the wall panels. It won’t be long before you notice severe “swarf rust” around the windows, directly undermining the building’s integrity.
Step 3: Apply A Waterproof Seal
Waterproof is the most “fatal” part of the installation. The wooden frame must be disposed of before the window is tucked in.
- Apply butyl tape: Apply a circle of heavy butyl tape to the entire periphery of the outer surface of the wooden frame.
- Why butyl? Unlike ordinary caulks that harden when they dry, butyl tape remains flexible and sticky. It can form a gasket-like permanent sealing layer between the rough wood/gold interface and the nail edge of the window.
Step 4: Insert And Fix The Window
The opening of the cave is ready and sealed. Now the window can be installed.
- In place: Insert the plastic steel window into the opening. Make sure that the nail edge of the window is tightly pressed against the butyl tape just pasted.
- Three-dimensional alignment: Before making any screws, make sure that the window is completely vertical, horizontal and square. If this step is sloppy, the window sash switch will definitely Caton in the future.
- Fixing: Put the screw directly through the nail edge and drive it into the wooden frame. Never try to fix it only to the steel plate. Only the wooden frame can provide sufficient nail holding force to ensure lasting stability.
Steel Structure Workshop
Steel Structure Workshops offer versatile designs. Clear Span ensures unobstructed space, while Centre and Intermediate Columns provide economical solutions for wide spans.
Bridge/Steel Structure Bridgeipsum
Steel Structure Bridges utilize high strength-to-weight ratios to achieve long spans where intermediate supports are difficult.Their versatility makes them essential for critical infrastructure connectivity.
Steel Structure Buildings
Steel Structure Buildings feature versatile designs to meet diverse needs. Clear Span offers open space, while Centre and Intermediate Columns increase economy for large spans. Multi Gable accommodates complex widths.
Step 5: Install The Z-type Flood Board
The moisture management at the top of the window is a place where many novices are prone to rollover. In this position, glue alone is absolutely unable to prevent water.
- Custom Z-type flooding: A custom bent Z-type flooding board is installed above the window head, usually called a dripping eaves.
- Function principle: One end of this metal plate should be inserted under the metal wall panel above the window, and the other end should be draped over the top of the window frame. Its function is physical diversion-the rainwater flowing down the wall is directly “guided” to the window, rather than allowing the water to seep behind the window frame.
Step 6: External Trim And Final Seal
The last step is about beauty and the second waterproof line of defense.
- J-Strip Trim: Install J-strips around windows. This will cover up the rough cut edges of the metal wall panel for a more neat and professional look.
- Polyurethane sealant: Finally, seal all gaps with high-quality polyurethane sealant. Because it has strong adhesion to plastic steel and metal, and is more resistant to ultraviolet rays than ordinary silicone. This ultimate seal will completely lock out moisture and air penetration.
As long as you strictly follow this “wooden frame method”, you can ensure that the installation structure of plastic steel windows is stable and watertight, so that your steel structure can withstand the test of wind and rain for many years to come.
Author: Mark Stevens
I’m a metal building specialist with over 18 years of construction experience. I specialize in barndominium conversions and exterior finishing. I wrote this guide to help you master the ‘wood buck’ method, ensuring your steel building windows are structurally sound and completely leak-free.