 GAOERJI STEEL
Search
How To Erect A Steel Building
Constructing steel structure buildings requires careful site preparation, foundation pouring, and sequential assembly of frame components. To successfully assemble a pre-engineered steel building kit, follow these critical steps: Foundation & Prep: Verify the foundation is square and anchor bolts are properly spaced (typically within 1/8 inch tolerance). Staging Materials: “Shake out” and stage your components to minimize handling time and organize parts by assembly order. Primary Framing: Erect the columns and rafters to form the main skeleton, immediately installing temporary X-bracing and tie-downs to prevent structural collapse during assembly. Secondary Framing: Install purlins, girts, and door jambs to rigidize the frame and prepare it for sheeting. Sheeting & Insulation: Install insulation and attach roof and wall panels using the manufacturer’s specified screw patterns to ensure weatherproofing. Trim & Accessories: Finish by installing trim, ridge caps, gutters, and doors to seal the building envelope.
This video explains in detail how to construct steel structure buildings:
Step1: Foundation And Preparation
The success or failure of the whole project was actually decided before the first steel column was hung up-it all depends on whether the foundation is accurate or not. You must ensure that the concrete slab or freestanding foundation is absolutely square and level. Usually I will take a tape measure to pull the diagonal, the length of the two lines must be exactly the same, this is the real square.
The most important thing is to check the anchor bolts. These bolts are the only nodes that connect the earth to your building. Be sure to check their position with engineering drawings, the tolerance is usually only 1/8 inch (about 3mm). If the bolt is off even a little bit, the pre-drilled steel column will not match, and the on-site reaming will be extremely time-consuming. Before starting the lifting, make sure that the thread is clean and the nut can be screwed in smoothly.
Step2: Material Swing Field
The efficiency of steel structure installation comes from the site organization. This stage is called “Shake out” in the line. Don’t think about the truck coming and what to unload. You need to unload all the components first and sort them on site.
Take the shipping list and lay the parts on the ground according to the chronological order of use. Place the steel columns next to the corresponding anchor bolts and the roof beams near the baring where they will be hoisted. This strategic placement minimizes the ineffective movement of heavy equipment. Arrange the parts according to the installation sequence, and the workers do not need to stop and look for components all over the place, so as to save the construction period.
Step3: Main Frame Installation
The main frame stage involves lifting the heaviest steel members: I-beams and roof beams. This will construct the main skeleton of the building.
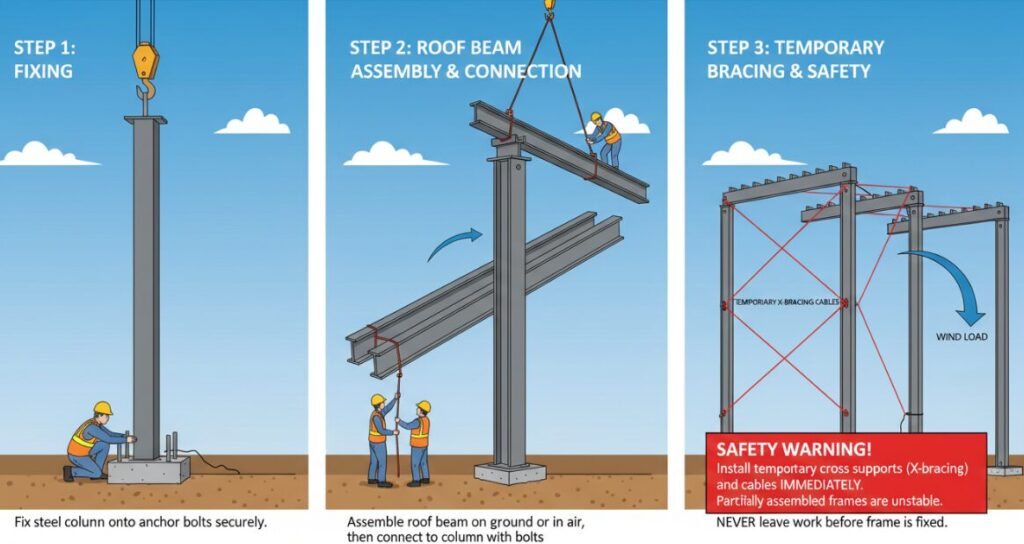
First column: fix the steel column on the anchor bolt.
Rear upper beam: according to the size, assemble the roof beam on the ground or butt joint in the air, and then connect it to the steel column with bolts.
Safety Warning: When erecting the main frame, temporary cross supports (X-bracing) and cables must be installed immediately. I have seen many thrilling moments in the field. The steel frame is very unstable before it is completely closed and supported. A gust of wind load can easily blow down a partially assembled frame if no steel cables or ropes are used as temporary supports. Never leave work before the frame is fixed.
Step4: Installation Of Secondary Structure
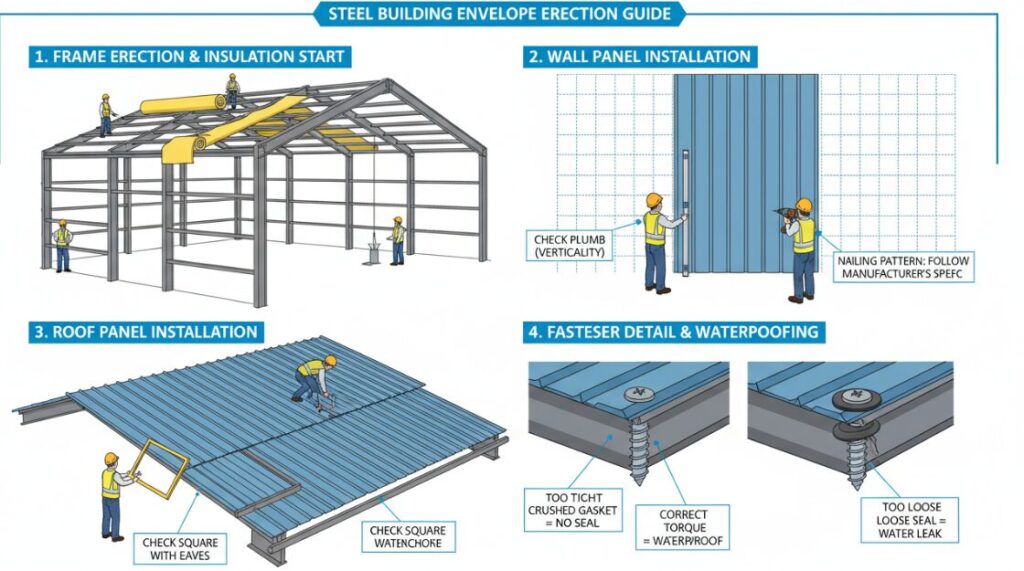
Once the main frame is erected and supported, the next step is to install the secondary structure. This includes roof purlins, wall girders and door frames. These components have two crucial roles:
Structural rigidity: They connect the main frame together, lock the structure, and provide lateral stability.
Clipboard foundations: They provide an attachment framework for subsequent installation of wall and roof slabs.
At this stage, pay special attention to whether the door frame of all rolling doors or pedestrian doors is square and vertical. If you don’t pretend to be upright at this time, believe me, you will be extremely painful when you install the door behind.
Steel Structure Workshop
Steel Structure Workshops offer versatile designs. Clear Span ensures unobstructed space, while Centre and Intermediate Columns provide economical solutions for wide spans.
Bridge/Steel Structure Bridgeipsum
Steel Structure Bridges utilize high strength-to-weight ratios to achieve long spans where intermediate supports are difficult.Their versatility makes them essential for critical infrastructure connectivity.
Steel Structure Buildings
Steel Structure Buildings feature versatile designs to meet diverse needs. Clear Span offers open space, while Centre and Intermediate Columns increase economy for large spans. Multi Gable accommodates complex widths.
Step5: Envelope And Thermal Insulation
Once the frame is rigid enough, you can begin to close the building. If your building needs insulation, it is usually installed simultaneously with the wall and roof panels. Insulation cotton will be laid on the frame before laying the metal plate.
When fixing roof and wall panels, the nailing arrangement pattern specified by the manufacturer must be strictly observed. These patterns are calculated to withstand specific wind suction and environmental loads and are not random hits.
Wall panel: ensure verticality (Plumb) before fixing.
ROOF PANELS: Make sure they are square with the eaves.
Fasteners: Don’t tighten the screws too tightly and don’t loosen them too much. Too tight will crush the gasket, too loose seal is not tight, both of which will destroy the waterproof.
Step6: Edge Closing And Accessories
The final step in the installation of the steel structure is the installation of the trim parts and accessories. This is not only to look good, but also the last line of defense.
Edge closing parts: install corner floodwater, gable edge closing and eaves edge closing to cover the exposed steel plate edges and gaps.
Roof cover plate: installed at the top of the roof to seal the joints of the two slopes.
Gutters and downspouts: Install these to effectively manage stormwater runoff.
Door: hang pedestrian door and rolling shutter door.
Where necessary, be sure to use high-quality sealant and closing strips (that is, foam blocks cut according to the profile of the plate) to ensure that the entire building envelope is completely sealed to prevent moisture, pests and air from penetrating.
Author: Jason Miller
With over 17 years of experience in the metal building industry, I specialize in pre-engineered steel structures. I’ve managed countless erection projects from simple garages to complex warehouses. I hope to break down technical construction processes into actionable steps, helping you build safely and efficiently.